CW119 Podium System
Using the Laptop and Projector

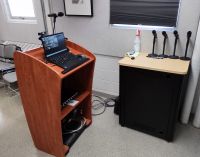
Fig 1: Podium & cabinet in CW119
(See
an annotated view)
The Physics Department conference room, CW119, now has a dedicated laptop and associated media devices built into the speaker's podium. This should make it easy for any Physics user to give local presentations or Zoom meetings with video and a robust room-wide sound system.
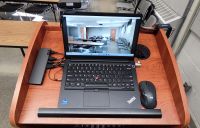
In most cases you can just turn on the projector and the laptop, log in with your Physics account, and you will be good to go. Everything should just work and you will have access to all the computing resources that you're used to. If you're tall you can use the power button on the body of the projector, or you can use the remote control that should be on the cabinet next to the podium. The power button for the laptop is the little round button on the upper right-hand side of the keyboard. There is a traditional wireless mouse as well, whose power switch is on the bottom.
Help is always available at any time from PCSC (and Vince Needham) in particular. Please don't wait to the last minute, though!
Zoom Meeting Features

Fig 2: Laptop & dock on the podium
(See
an annotated view)
If you aren't already familiar with using Zoom, please see our Zoom Tips & Tricks tutorial first.
When using the system for Zoom meetings you'll probably want to use the microphone and speaker system. There are five microphones at the ready: one for the speaker on the podium and four others that are usually deployed one to a table. The full set has proven to work well for large group meetings like the AMO group's weekly "Nuts & Bolts". Simply set out the mics you want and turn them on. An LED will light when the mic is on; extra 9V batteries can be found in the cabinet nearest the refrigerator (where there are also three extra microphones).
Zoom has a built-in audio test feature that you should use before your meeting starts. Click the "up" arrow next to the mic icon on the Zoom taskbar to get to the audio options. Click "Test Speaker & Microphone". A tune will play that you should hear from the room speaker next to the projection screen. There's an old-fashioned volume knob on that speaker that's the best way to adjust it. Note that the projector must already be on - the audio passes from the laptop to the projector via the HDMI cable. Zoom identifies the microphone as "Microphone (Realtek Audio)" and the speakers as "Matrix Switch (HD Audio...)". You'll next be prompted to test the microphone by speaking. Say something. The test will echo that back through the speakers a moment later. Again, the source should be the system Realtek audio if you are using the external mics. The gain of each microphone is independently adjustable on the front panel of the receiver sound inside the podium. The mics are numbered with their channel ID. In addition, there is a small preamp on top of the receiver with its own knob; htat acts as a master gain for the entire system. Ordinarily you should not fiddle with any of this. When the sound check is done, click "End Test" and you're ready for your meeting to start.

Fig 3: Mic receiver controls in podium
(See
an annotated view)
There is an external video camera connected to the laptop as well to provide views of the local meeting participants. This camera can be swiveled through a full 360 degrees and easily tilted by hand. It simply rests on top of the laptop screen and can be moved around as needed. You'll need to allow Zoom video streaming permission to see the view, of course.
Technical Details
If you need to do anything more sophisticated, it's best that you seek help from PCSC and Vince Needham in particular. There is a separate web page with a deep dive into the details and links to specifications and manuals for the hardware.
