CW119 Podium System Details
The Deep Dive for the AV Club Nerds
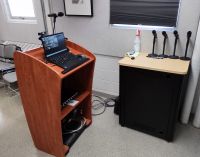
Fig 1: Podium & cabinet in CW119
(See
an annotated view)
The Physics Department conference room, CW119, now has a dedicated laptop and associated media devices built into the speaker's podium. This should make it easy for any Physics user to give local presentations or Zoom meetings with video and a robust room-wide sound system.
In most cases you can just turn on the projector and the laptop, log in with your Physics account, and you will be good to go. Everything should just work and you will have access to all the computing resources that you're used to. If you have more sophisticated needs or want to use your own device, this page is a deep dive into the details you may need to know. You should have perused the simpler guide before plowing into this page.
Help is always available at any time from PCSC (and Vince Needham) in particular. Please don't wait to the last minute, though!
Laptop, Dock & Cables
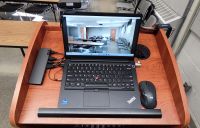
Fig 2: Laptop & dock on the podium
(See
an annotated view)
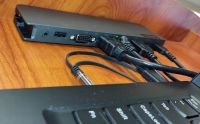
Fig 3: USB dock detail view
(See
an annotated view)

Fig 4: Laptop left ports detail
(See
an annotated view)
We begin with the laptop computer (figure 2), anchored to the top of the podium with a security cable and a variety of signal cables. It is a Lenovo ThinkPad E14 Gen 2 with a 14-inch display and more than adequate computing power for the job (user manual here). It features multiple pointing options: a trackpad, a fingertip joystick and a traditional wireless mouse. The separate mouse has a switch on the bottom and communicates via a small dongle in a USB port of the laptop. Please do not remove that dongle, ever. The laptop has a companion dock (quick-start guide here) to expand the port selections (figure 3 & 4).
If the laptop needs to be moved, the key to the security cable is available from the main office or from Vince. Do be sure to lock it back up when you are though. We don't want it to sprout legs and walk away.
Most laptop external functions are connected through the dock. Power is supplied to the laptop and the dock via USB-C (there is a free AC outlet inside the podium cable well, too). A wired Ethernet connection to the Physics network is available (note that only registered devices are allowed; all others please use wireless). An external wide-angle video camera is perched on the laptop display and connected to the dock. The HDMI video output to the projector also plugs in here (there is also such a port on the laptop - the dock is more convenient). There is a free USB-2 port suitable for memory sticks (there is a free port on the right of the laptop, as well). Lastly, there is a multifunction audio jack. This jack on the dock does not play well with the laptop audio system, so use the jack on the laptop itself.
The audio cable emerging from the podium is connected to the radio microphone receiver and has a multifunction plug adapter on it. The cable from the receiver has an older style input-only jack, while the laptop uses a newer multifunction mic/headphone design, thus the need for the adapter. If you have some other audio device you would like to use please check to see which jack is required (and please don't lose the adapter).
The AV Systems
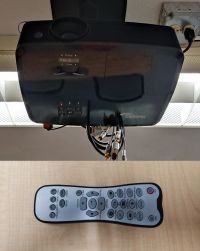
Both audio and video are served through the Optoma projector bolted to the ceiling. Usually all you need to do is turn this on. The power button is on the body of the projector near the status LED - push once for on, twice to turn it off. There is also a remote control that should be on the cabinet adjacent to the podium (see figure 5). Please avoid fiddling with the optional projector controls. It is set up happily for normal use.
There are both internal and external video cameras for the laptop. Unless you want the weird built-in camera angle of just the presenter, use the external camera. It is almost infinitely adjustable, with a full 360-degree swivel and a wide range of tilt. It's just perched on the laptop display, so it can be relocated or the tilt readjusted that way, too.
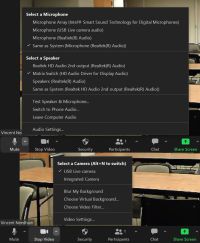
Audio from the laptop travels through the HDMI connection to the projector and thence to the loudspeaker in the front corner of the room. The default laptop Realtek sound system routes sound this way and should be the option that Zoom and other applications use. Zoom identifies the microphone as "Microphone (Realtek Audio)" and the speakers as "Matrix Switch (HD Audio...)". There is an actual real volume knob on the loudspeaker that is the easiest way to control the loudness. There is an audio test in Zoom that you should use before starting any meetings to be sure of your connections (more below).

Fig 6: Mic receiver controls in podium
(See
an annotated view)
For videoconferencing, sound can originate from our system of radio microphones. This uses a Pyle PDWM8400 Microphone system with a total of eight microphones (manual here). Five mics are usually deployed: one for the speaker at the podium and four others that can be placed one to a table. Three remain in reserve, stored in the kitchenette cabinet nearest the refrigerator. Extra 9V batteries for the mics can be found there, too. The system automatically mixes the inputs from all the sources, and to date we haven't had issues with feedback.
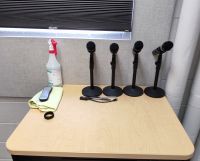
The receiver is inside the podium (figure 6) and the free mics are stored atop the cabinet next to the podium (figure 7). Please return them there when you events are complete. There is a switch on each mic. An LED will light when the mic is on (ignore the LED colors - they're meaningless). If the LED does not light the battery is probably dead. Unscrew the base of the mic to swap the battery out. Each mic is labeled with a number corresponding to its channel on the receiver. Each channel has independently controlled gain, adjusted with a knob on the front of the receiver. There is a small preamplifier sitting on top of the receiver. Its knob acts like a master gain for all channels. The default positions for all these gains works well for large group meetings (like the AMO "Nuts & Bolts"). The knobs are usually at about the 75% position. Please resist the temptation to fiddle with them.
Zoom Videoconferencing
(You may wish to review our introductory Zoom Tips & Tricks tutorial.)
This system has two principal tasks: local presentations (mostly PowerPoint) and videoconferencing (mostly Zoom). The sound system evolved to work for large group meetings - the AMO group "Nuts & Bolts" in particular. With a mic on each of four tables and the podium mic for the presenter, remote listeners should be able to understand what's going on. Zoom provides a convenient test mode you can use to assure that the mics and loudspeaker are working as expected.
As previously mentioned, audio from the laptop travels through the HDMI connection to the projector and thence to the loudspeaker in the front corner of the room. The default laptop Realtek sound system routes sound this way and should be the option that Zoom and other applications use. Zoom identifies the wireless microphone system input as "Microphone (Realtek Audio)" and the speakers as "Matrix Switch (HD Audio...)". There are potentially two video cameras available: the integrated laptop camera and the external USB camera. You will almost certainly never want to use anything but teh external camera. The Zoom menus showing these settings are in figure 8.
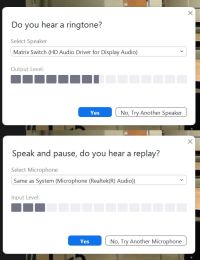
To run the audio test, click the "up" arrow next to the mic icon on the Zoom taskbar to get to the audio options (figure 9). Click "Test Speaker & Microphone". A tune will play that you should hear from the room speaker next to the projection screen. Note that the projector must already be on - the audio passes from the laptop to the projector via the HDMI cable. You'll next be prompted to test the microphone by speaking. Say something. The test will echo that back through the speakers a moment later. If you have mics out on the tables, go to at least one of those and whisper into it to be certain that the audience will be heard as well as the presenter. When the sound check is done, click "End Test" and you're ready for your meeting to start.
In Conclusion
A final word to the wise: always log out of public computers and their applications! In my experience no one remembers to log out of Zoom and I've come across countless computers with users still online. That's fertile ground for mischief! Don't let it happen to you.
If you need further guidance, it's best that you seek help from PCSC and Vince Needham in particular.
