Configuring E-Mail Clients
Pretty much every computing device these days does e-mail. Your phone, tablet, laptop, and desktop all have some sort of dedicated e-mail program or app. Nowadays, thanks to "autodiscovery", most e-mail accounts can automatically configure themselves. This includes the Physics Exchange server and popular third-party mail services like Google Mail. Occasionally you may still need to set up an account by hand, though. This tutorial will show you how to set up accounts in Microsoft Outlook and on Android devices both the easy way and the hard way.
Automatic Outlook Setup
When you start Outlook for the very first time, it will prompt you to create an account. If Outlook is already on your PC and you want to add another account, go to Outlook's "File" tab, click the "Account Settings" button and then the "Account Settings" item from the drop-down menu. An "E-Mail Accounts" window will open, and you'll pick "New..." and then "E-Mail Account". (In Outlook 2016, there's even a dedicated "Add Account" button at the top level of the Account Information tab, so you don't even have to drill down the menus.)
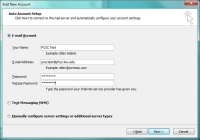
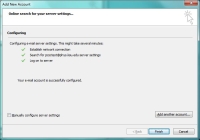
All of these approaches lead you to the "Auto Account Setup" box pictured in Figure 1. Select "E-Mail Account" and enter your name, e-mail address and password. If you're lucky, this will be all you need. Click "Next". Outlook will try to contact your mail server and automatically configure itself. If successful, you'll see a series of green check-marks appear, as in Figure 2. Then you just click "Finish" and you're ready to go!
As an example, if you want to add your K-State mail account, you would enter your name ("Willie Wildcat"), your K-State eID as your e-mail address ("willie@k-state.edu"), and then your university password. When you hit "Next", you may see an additional window pop up with the K-State logon page; you'll need to enter those credentials again. A moment later, everything should complete and your account is ready to use from Outlook.
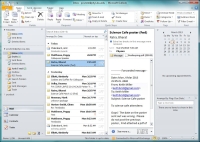
Outlook will open into its default appearance, with columns dedicated to your inbox, a reading pane, and other information (see Figure 3). You can do an enormous amount of customization to this basic look. Click on the "View" tab to access the ribbon controls for this. A full explanation of customizing the view is for another tutorial someday; for now, start by exploring the "Layout" controls. These let you move the inbox, reading and other panes around to your taste.
Manual Outlook Setup
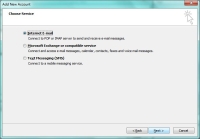
You might not be so lucky as to get everything done for you automatically, though. In that case, you have to configure the account by hand. You start the same way as above, but when you reach the "Auto Account Setup" window you will choose "Manually configure..." and click "Next". In the "Choose Service" window (Figure 4) pick "Internet E-Mail" and hit "Next" again.
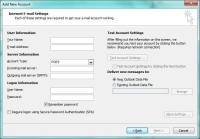
Now we reach the complicated bits (Figure 5). You will need to know some details about your mail server, which should be available from your provider. In this example, we'll set up a Google Mail account using their help information.
The top and bottom two fields shown in Figure 5 are the easy and obvous ones: your name, address and password. The three middle fields are more technical. Mail can be delivered either uing the "POP" or "IMAP" protocols. POP is the easier to use, and just moves mail to your inbox. IMAP tries to mirror what is on the e-mail server, and is the better choice for power users ar accounts accessed from many locations or clients. We'll choose IMAP. Once that choice is made, you need to know the names of the incoming and outgoing mail servers. Google follows what is a nearly universal de facto standard, naming these "imap.gmail.com" and "smtp.gmail.com".
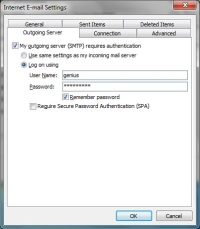
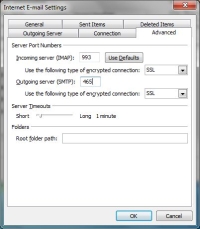
There's still more detail lurking behind the "More Settings" button. Click it and a tabbed window opens. We're interested in the "Outgoing Server" tab (Figure 6) and the "Advanced" tab (Figure 7).
You have to log into your Google Mail account in order to send mail from it, so we need to specify that and provide your credentials. Under the "Outgoing Server" tab, choose the "requires authentication" option, and then enter your Google Mail username and password. Check "Remember password" if you don't want to be hounded for it every time you send mail.
Now for really grotty bits. Network services like e-mail talk to the server computers through "ports". Every individual service has a numbered port associated with it. We have to tell Outlook these port numbers under the "Advanced" tab. Google Mail uses port 993 for IMAP, with SSL encryption to keep your mail confidential. Outgoing mail uses port 465 and SSL encryption. Enter these numbers, then click "OK" to get back to the main account window of Figure 5.
Back in that main window now, you'll notice that there is a "Test Account Settings" button, plus a (redundant) "Test" checkbox. Clicking that button will try to send a test e-mail through the newly configure account. Clicking "Next" with the checkbox checked does the same thing. I suggest just hitting "Next". If all is well, a message will be sent and then received by Outlook. If not, go back and check for typos.
Your account should now be configured and you can proceed with customizing the look-and-feel of Outlook, as we talked about above.
Android Mail Apps
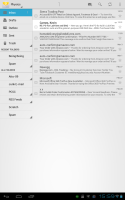
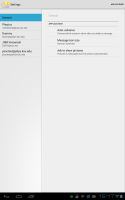
Now we turn our attention to portable devices, specifically, Android phones and tablets. This example uses the stock e-mail app from an Android 4 "Ice Cream Sandwich" tablet. The exact appearance of your app may vary somewhat, but the basic steps outlined here should still apply. Figure 8 shows the normal appearance of the mail app; tap for the main menu and go to "Setings", as seen in Figure 9.
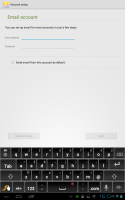
Usually near the top of the settings page will be an "Add Account" or "+" button. Tap that to get to the new account page. You will be prompted for your e-mail address and password (Figure 10). Hitting the "Next" button will begin an attempt to set up your account automatically. If you need or want to do it by hand, use the "Manual Setup" button.
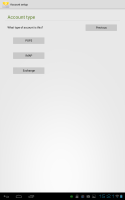
"Next" brings up a screen asking what sort of account you have: IMAP, POP or Exchange (Figure 11). For the Physics department, use "Exchange". Now your device will launch autodiscovery and try to configure your account automatically, and it should work. You may get a warning that the mail server needs control of your security settings. This is normal, and you should say "OK". If successful, you'll now get a screen of "Account Options". These should generally be self-explanatory and you can pick and choose from them as you like. Accepting the dafaults would be fine for most people. Click "Next" again when you're ready, and the configuration is complete. You can now give this new account a name - anything you want. Your device will connect and download your mail.
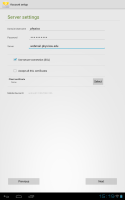
To manually set up your e-mail account, start as above and enter your e-mail address and password. At this point, tap the "Manual" button (see Figure 10 again). You will again be asked for the type of account, and again, select "Exchange". The next screen will ask you for information about the server (Figure 12).
You'll need to re-enter your e-mail address on the "Domain\username" line, and enter your password again under "Password". The server name is "webmail.phys.ksu.edu", and you should select "Use secure connection (SSL)". You may safely ignore the parts about security certificates.
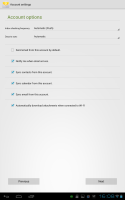
Tapping "Next" should cause the device to go find the server and establish the connection. You may see the security warning again; if so, accept it. The account should be successfully connected at this point, and you will get the Account Options page (Figure 13). Again, you may pick and choose as you like from these, or just accept the defaults.
As an example of manually setting up an IMAP account, we'll use Google Mail again. Begin as before, by entering your address and password. For the account type, this time choose IMAP. You'll get a variation on the server settings page that will ask for your credentials again (it might automatically populate this), plus server information. Just as before, the IMAP server name is imap.gmail.com, the security type is SSL/TLS, and the port number is 993. Ignore the "path prefix" field. HIt "Next" to get to the outgoing server settings. Like before, the server name is smtp.gmail.com, the security type is SSL/TLS and the port number 465. Make sure that the "Require sign-in" box is checked, and that yet another set of your credentials is filled in for you. Hitting "Next" will connect the account, and again you can choose some personal account options. A final tap on the "Next" button should complete the setup.
Summary
You should use the automatic configuration of your accounts wherever possible. For the Physics accounts, you should use the Exchange server, if possible. In other circumstances, we recommend the IMAP protocol. Here in tabular form are the details for manually configuring either your Physics account or your Google mail account.
| IMAP Configuration | ||||||
|---|---|---|---|---|---|---|
| Incoming | Outgoing | |||||
| Server | Port | Security | Server | Port | Security | |
| G-Mail | imap.gmail.com | 993 | SSL/TLS | smtp.gmail.com | 465 | SSL/TLS |
| Physics | webmail.phys.ksu.edu | 993 | SSL/TLS | webmail.phys.ksu.edu | 587 | STARTTLS |
