Burning Files To A DVD
Nowadays, with the easy availability of large, cheap USB flash drives, "burning" DVDs is getting to be an uncommon practice. It is still a good way to archive old data, though, and this tutorial will teach you how to use the tools built into Windows 7 to do the job.
First, obviously, get a blank DVD. These can be found in PCSC or gotten from Jane Peterson. JRM personnel can find them in the lab conference room or can get them from Vince Needham.
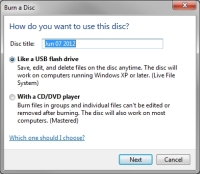
Insert the disk into a DVD writer. Open the Start Menu, and double-click on "Computer" to open the Windows Explorer. When that opens, double-click on the name of the DVD writer (typically drive letter "E"). A small window will pop up asking how you want to burn your disk (see Figure 1).
First, you will want to give you disk a title. By default, Windows offers the current date; you might want something more descriptive.
Next you need to decide if you want your disk to be a single, fixed and unchangeable archive of your data, or if you want to be able to add files to it later. The first option "Like a USB flash drive", lets you add files to the disk later. The second option, "With a CD/DVD player", creates an unchangeable archive. The second option is the safer and more universally readable option. If you want to use the "live" option, you're probably better off with a flash drive. For this demonstation, we'll click the check box for the second, archival option. When you've made your choice, click "Next".
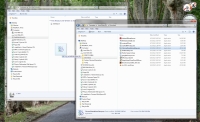
A Windows Explorer window opens showing you the currently empty contents of the disk. You can now drag-and-drop or copy files to here. Figure 2 shows a file being dragged from one Windows Explorer window to another. You can send files to this drive any way you want to until you have chosen all that you want or you fill up the disk. DVDs typically hold about 4.7 GB of data. You may also delete, rename or reorganize files into folders if you want (until you actually burn the disk -then it's permanent - but for now you're just making a list).
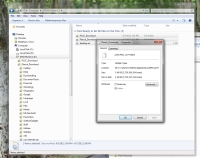
To discover the total size of all the files you have chosen, click on the first item in the Explorer view, the hold down the Shift key as you click on the last item. This will highlight all the items in the list. Right-click on the highlighted list and choose "Properties" from the drop-down menu. A "Properties" box will open, showing you, among other things, the total size of all the selected files (Figure 3).
Note, too, that once you start picking files to burn, a balloon-help message with occasionally pop up from the taskbar reminding you that "you have file waiting to be burned to disc" (see Figure 4).
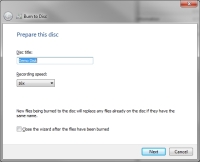
When all your files have been chosen and your sure you're ready, it's time to actually burn the disk. On a bar across the top of the DVD drive Explorer window you will find the "Burn to disc" option (see Figure 3 again). Click this, and another pop-up appears titled "Prepare this disc" (Figure 5). Our previously chosen title of "Demo Disk" shows up, and we are given the choice of burning speeds and an option to close the burning wizard when the job is complete. You can safely ignore those options. Click "Next" to continue.
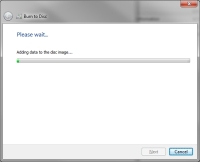
Now we are actually burning the disk, and it will take some time. A window appropriately titled "Please wait..." will show you the progress of the write operations (Figure 6). Go get a cup of coffee.
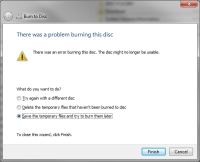
In the off chance that something goes wrong, you'll get an error message (see Figure 7). The most likely cause for this is a bad blank DVD. You have the option to try again with a fresh DVD, save your list of files for later, or just give up and delete everything. With any luck, you will never see this error message.
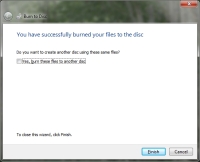
When the burning is done, you'll get a new window announcing the success (Figure 8). The drawer of your DVD writer should slide open for you to retrieve the finished product. The window gives you the option of burning another copy; click the check box and get another blank disk if you do. If not, just click "Finish" and you're (nominally) done.
It's always a good idea to do a little quality control. Pop your freshly-burned disk back into the drive and look at it in the Windows Explorer. Make sure all the files you expect to see are really there, and maybe open one or two to confirm that the data is good and that the burn was genuinely successful. Now retrieve your disk, label it with a Sharpie, and you're really done!
There is another kind of DVD burning that you may need to do. Sometimes complete binary images of a disk are distributed for download online. A Linux installation disk would be a good example. These images are a single giant file called an "ISO". Please see our separate tutorial to learn how to handle these.
Finally, you may learn more about DVD burning from this Microsoft How-To page, or you might want to learn the nuts-and-bolts of optical storage from Wikipedia.
