Configure BitVise for X11
BitVise is the free Secure Shell (SSH) client we recommend. SSH is how you log in and get a command-line terminal for use with Linux. You'll also want the graphics supplied with the Xming X11 system; that requires some configuration of BitVise.
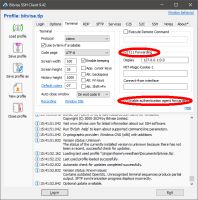
Open BitVise and select the "Terminal" tab, as shown in the figure. You need to check the "X11 Forwarding" and "Enable authentication..." options, as highlighted. The "Display" field should already be filled; the address "127.0.0.1" just means the local machine, while the appended "0.0" select X display port zero.
Pro tips: On the "Options" tab, choose "Always" from the "Open Terminal" field. That way BitVise always automatically opens a terminal window when you make a connection. Otherwise it connects silently, which is confusing, and then you have to do it yourself. If you consistently log into the same machine with the same account, you may want to put your username and the host machine address into the "Login" tab, then "Save profile" so BitVise remembers this from session to session,
When you login for the first time you'll get a scary "new host key" warning - you can trust us, so "accept and save" that.

